Best Diff Breathers for Jeep JK: Extended Vent Kits & Water Fording Protection
Best Diff Breathers for Jeep JK: Extended Vent Kits & Water Fording Protection
FTC Disclosure: This article contains affiliate links to Amazon products. We may earn a commission if you click and make a purchase at no additional cost to you.
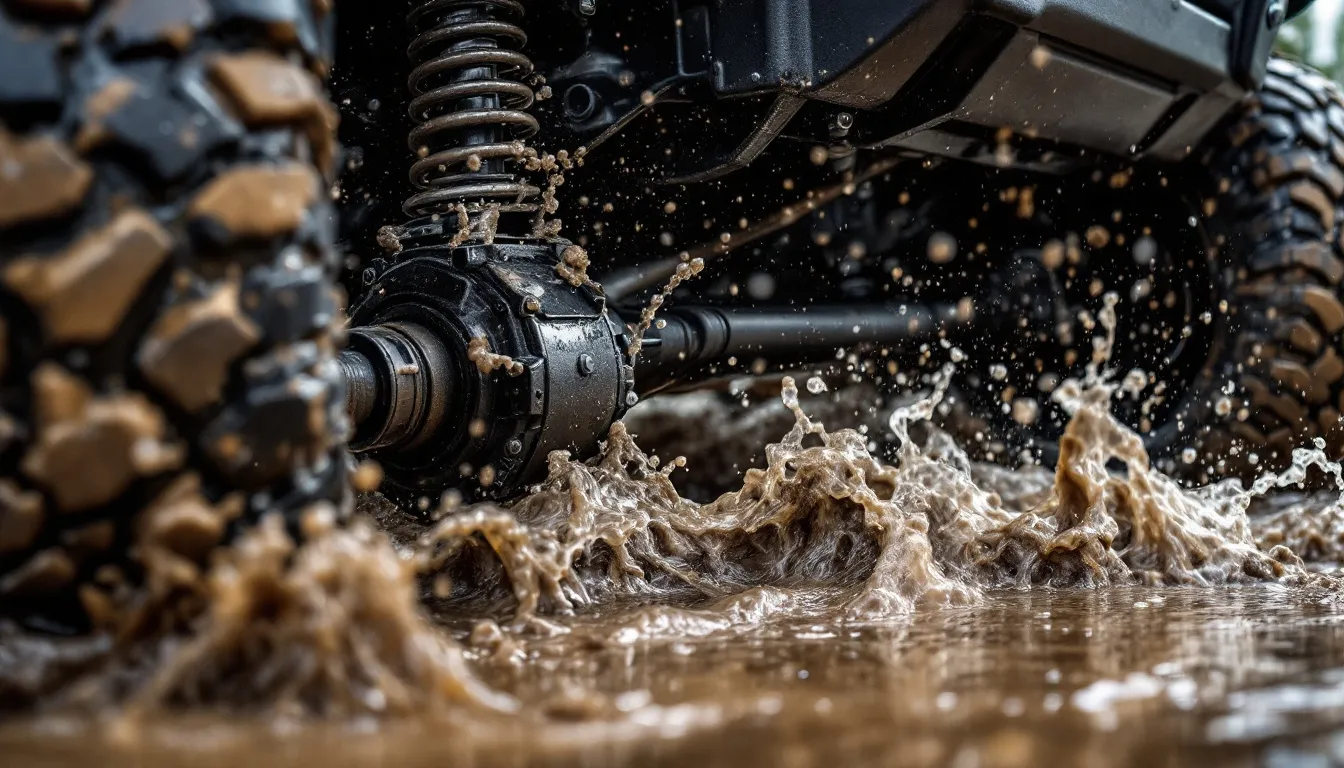
You’re mid-trail, feeling confident as your JK plunges into a water crossing that’s deeper than expected. The water rises past your diff covers, and you don’t think twice about it—until three weeks later when you hear grinding during a turn. You pull the diff cover and find chocolate milk where your gear oil should be. Water got in through the factory breather vent during that crossing, and now you’re looking at a $1,500 rebuild.
This scenario plays out more often than most JK owners realize. Your differentials heat up on the trail, creating pressure that needs to escape through breather vents. When you submerge hot axles in cold water, they suck in whatever’s around them—mud, water, or both. Factory breathers sit low on the axle housing, right in the splash zone.
The solution is simple: extended differential breathers relocate the vent opening to a higher, drier location—typically under the hood or integrated with a snorkel system. It’s cheap insurance that protects thousands of dollars in drivetrain components.
This guide covers everything you need to know about the best diff breathers for jeep jk models from 2007 through 2018. We’ll explain why you need them, what makes a quality kit, where to route the lines, and how to install them. We’ll also be honest about when you can skip this mod entirely. If you’re already upgrading your diff covers, now’s the perfect time to tackle breathers too.
Why Your JK Needs Extended Differential Breathers
Your JK has three critical breather vents: front differential, rear differential, and transfer case. These vents allow hot air to escape as components heat up during operation. Without them, pressure builds and blows out seals.
The factory breathers sit in a dangerous spot. They’re positioned on the axle housing itself, typically 18-24 inches off the ground. Fine for highway driving. During water crossings, mud bogs, or even heavy dust conditions? They’re in the splash zone.
Here’s what actually happens during a water crossing. Your differentials run hot—often 180-220°F after highway driving or wheeling. You hit cold water, and the temperature drop creates a vacuum inside the housing. Water gets sucked in. Destroys bearings. Turns gear oil into useless sludge. The gears can’t get lubricated. Bearings start pitting within miles. Ring and pinion wear accelerates.
Most owners don’t realize they have a problem until it’s catastrophic. The damage is silent and progressive.
Extended breathers solve this by relocating the vent opening to safety—usually under the hood near the firewall, integrated into the air box, or connected to a snorkel intake. Even if your axles are completely submerged, the vent opening stays high and dry. No vacuum effect. No water ingestion. No $1,500 repair bill waiting for you.
The mod matters most for Rubicon models with factory Dana 44 axles, which see more aggressive trail use. But any JK that ventures off pavement benefits from this protection.
My approach to researching modifications comes from years of watching owners chase marketing hype instead of real-world results. I don’t trust manufacturer claims. I trust what experienced trail veterans actually say works. Extended breathers consistently rank in the top five “do this first” mods in every serious JK forum, not because they’re exciting, but because they prevent catastrophic failures.
What to Look for in a Quality Extended Breather Kit
Before diving into specific products, let’s talk about what separates a kit that actually protects your drivetrain from one that’ll leave you stranded.
You’re looking at a system that includes extended vent lines (typically 6-10 feet of 1/4” fuel-grade hose), vent filters or check valves, mounting hardware, and adapters that connect to your factory breather ports. Many kits include T-fittings so you can run all three vents—front diff, rear diff, transfer case—to a single filter location.
Hose quality matters more than price. The best kits use fuel-grade hose that resists heat and abrasion. Cheap vinyl line cracks after a season of heat cycles and UV exposure. Quality vent filters use sintered bronze or stainless elements that breathe but keep water out. Some systems use check valves instead of filters, which prevent backflow but don’t filter dust.
You’ll find options from ARB, Rugged Ridge, TeraFlex, and several other off-road brands in the $40-80 range for a complete kit. Installation takes 1-2 hours even if you’ve never done it before.
For the front differential, run sintered filters—they catch the dust that gets kicked up on technical terrain. For the rear differential, check valves often make more sense since mud and water splashes are your main concern there. Transfer case? A filter keeps it protected during dusty climbs. This layered approach gives you protection tailored to each vent’s real-world exposure.
Installing Extended Breathers: The Reality of DIY Work
Extended breather installation is one of the most straightforward mods you’ll tackle on your JK. No welding. No cutting. Just basic hand tools and an afternoon.
I’ve done this install twice—once on my buddy’s bone-stock JKU and again on a Rubicon with full armor. Both took about the same time because the breather location doesn’t change.
Step 1: Locate your factory breather vents. The front differential breather sits on top of the diff housing, usually on the passenger side. Pop off the plastic trim pieces if they’re in the way. The rear differential breather is in a similar spot. The transfer case breather is on the driver’s side of the transfer case, often with a small rubber hose already attached. On 2007-2011 models, you might find the transfer case breather routed to the frame rail.
Step 2: Remove the factory vent lines. Most factory breathers use a simple press-fit rubber hose that pulls off by hand. Some have a small clip you need to release. Keep the factory lines as backups—you’ll be grateful if you ever need to revert.
Step 3: Install the new extended lines. Your kit includes adapters that screw or press into the factory breather ports. Route lines away from exhaust heat. Run them along the frame rail or tucked behind the inner fender liner. Secure every 12-18 inches with zip ties so vibration won’t work them loose. Avoid sharp bends that could kink the line and restrict airflow.
Step 4: Choose your termination point. Most JK owners route all three vent lines to a common filter location under the hood. Popular spots: the firewall near the brake master cylinder, the inner fender well, or integrated with the airbox. If you have a snorkel, run the breather lines up the A-pillar and connect them to the snorkel head—this gives maximum fording depth.
Step 5: Install the vent filter or check valve. Mount it securely so vibration won’t loosen it. The filter should point downward to prevent water accumulation. Some owners prefer installing individual filters for each line rather than using a T-fitting—this prevents one contaminated vent from affecting the others.
Step 6: Check for leaks. Start the engine, drive around the block, and verify all fittings are tight. Check that lines aren’t rubbing anything that moves or gets hot.
If you cross deep water and suspect contamination despite your extended breathers, drain and refill your diff oil immediately. I keep a quart of synthetic 75W-90 in my JK at all times for exactly this reason.

Valvoline FlexFill Pouch Synthetic 75W-90 Gear Oil
Key Features:
- Flexible pouch with long spout for awkward angles
- Synthetic formulation resists water contamination better than conventional oil
- 1-quart size fits under dash storage
- Supports field gear oil changes without pump
Pros: Easy field application, quality synthetic blend, compact storage
Cons: Single quart (you may need 2 for complete drain), pouch can be messy if punctured
$12-15 per quart
Check Price on Amazon →This Valvoline FlexFill pouch makes field gear oil changes actually feasible. The flexible pouch and long spout let you fill diff covers from awkward angles without a pump. After any sketchy water crossing, I’d rather spend 20 minutes changing oil on the trail than risk contamination damage on the drive home.
The installation process is basically identical whether you’re working on a 2-door or 4-door JKU, and all model years from 2007-2018 use the same basic breather locations. However, if you’re installing lockers or regearing, coordinate your breather install with that work—you’ll already have the diff covers off. For more on the subtle differences between model years that might affect routing, check out our guide to JK model year differences.
Breather Kits: The Details That Matter
Not all breather kits deliver the same level of protection. Here’s what separates a system that’ll save your drivetrain from one that’ll fail when you need it most:
Hose material and heat resistance. Look for actual fuel-grade or hydraulic-grade hose, not generic vinyl tubing. The lines run near exhaust components and hot axle housings. Cheap vinyl gets brittle and cracks. Quality hose stays flexible through temperature swings and resists abrasion from trail debris. 1/4” inside diameter is the standard size.
Filter vs. open vent vs. check valve design. This is where breather selection gets interesting. Open vents (just a hose terminating under the hood) are simple but let dust straight in. Vent filters use a sintered element that breathes while blocking water and dirt—ideal for dusty conditions but needs periodic cleaning. Check valves allow air out but prevent backflow in—they work for water crossings but don’t filter dust. Experienced wheelers often run filters on the front diff and transfer case (high dust exposure) and check valves on the rear diff (less dust, more water splash).
Line length and routing flexibility. You need at least 6 feet per vent to route from the axle to under-hood mounting points. Longer is better—8-10 feet gives you routing options and lets you relocate the filter later if needed. Kits with pre-cut lines at exactly 6 feet force compromises.
Quality of fittings and adapters. The weak point in many cheap kits is the brass fittings that connect to factory breather ports. They should be actual machined brass, not plated pot metal. Look for kits that include lock washers or thread sealant. Push-to-connect fittings are easier to install than barbed fittings but can pop loose from vibration—I prefer barbed fittings with hose clamps.
Compatibility with diff cover upgrades. If you’re running aftermarket diff covers with built-in breather ports, verify that your breather kit includes the right adapters. Some heavy-duty diff covers use 1/8” NPT ports instead of the factory push-fit style.
Complete kit vs. DIY parts. Pre-packaged kits include everything you need and ensure component compatibility. DIY builds using individual hose, fittings, and filters from the hardware store can save money but require research. For first-timers, a complete kit eliminates guesswork.
The goal is straightforward: keep water and contaminants out while allowing air pressure to equalize. A quality $60 kit does this reliably for years. A $25 bargain kit might leave you stranded with gear oil contamination.
Do You Actually Need Extended Breathers?
Let’s be honest: not every JK owner needs this mod. If you never venture deeper than mud puddles in a parking lot, the factory breathers work fine. Extended breathers protect against specific conditions.
You absolutely need extended breathers if you:
• Cross water deeper than 12 inches regularly
• Wheel in deep mud or dust that kicks up around the axles
• Run aggressive trails with frequent suspension articulation
• Have invested in expensive drivetrain upgrades like lockers or regear kits
I learned this lesson the hard way. Four months of struggling with stock gears on 35s before regearing to 4.56—the transformation in driveability was incredible. The JK went from sluggish and constantly downshifting to confident and responsive. But regearing isn’t cheap, and once you’ve dropped $600+ on new gears, protecting that investment becomes obvious.

Yukon Gear & Axle - Gear & Install Kit for Jeep JK non-Rubicon 4.88 Ratio (includes ring and pinion)
Key Features:
- 4.88 ratio suited for 33-35" tires with modern engines
- Includes ring and pinion gears plus installation components
- Compatible with 2007-2018 JK non-Rubicon models
- Improves low-end torque and off-road responsiveness
Pros: Complete kit with all components, quality Yukon reputation, noticeable performance gain on larger tires
Cons: Installation requires professional or experienced builder, significant investment, requires differential cover removal
$600-700
Check Price on Amazon →This Yukon gear kit represents a serious investment in your JK’s performance. When you’re $600+ into new ring and pinion setup, spending another $60 on extended breathers is a no-brainer. It’s cheap insurance against water contamination that could destroy those gears in a single deep water crossing.
You can probably skip extended breathers if you:
• Never wheel harder than maintained forest roads
• Live in a dry climate and actively avoid water crossings
• Plan to sell your JK soon and won’t recoup the mod cost
• Only drive on pavement
The mod is also less critical on newer JKs that haven’t seen much off-road use yet. If you’re still deciding whether you’re a serious off-roader or a casual enthusiast, wait on breathers until your wheeling habits become clearer. For more on choosing between JK generations, see our JK vs JL comparison.
Bottom line: extended breathers are cheap insurance against expensive failures. They’re most valuable for owners who regularly challenge their JK’s capabilities in wet, muddy, or dusty conditions.
Common Questions About Differential Breathers
How often should I check my diff breathers after water crossings?
Inspect breather lines and filters after every deep water crossing—anything above your diff covers. Check for water in the filter housing and verify all connections are still tight. If you use open vent lines without filters, pull your diff fill plugs within 24 hours and check the oil condition. Milky or contaminated oil means water got in despite the extended lines, and you need to drain and refill immediately before permanent damage occurs.
Can I use a snorkel and extended breathers together?
Absolutely—this is actually the ideal setup for maximum fording capability. Route your extended breather lines up the A-pillar alongside your snorkel intake, and terminate them at the snorkel head or just below it. This puts your diff vents at the same height as your engine’s air intake, maintaining consistent water fording depth across all critical systems. Make sure breather lines don’t interfere with snorkel airflow.
Do I need to replace the breather filter, and how often?
Clean or replace filters every 6-12 months depending on conditions. If you wheel in dusty environments frequently, inspect filters after every few trips. Sintered bronze filters can be cleaned with brake cleaner and blown out with compressed air. Paper element filters need replacement when clogged. Clogged filters restrict airflow and can cause the same pressure buildup problems that breathers are meant to prevent. Set a phone reminder to check them.
Will extended breathers affect my JK’s warranty?
Extended breathers are considered routine maintenance modification similar to changing your oil or upgrading floor mats—they won’t void your warranty. However, if you file a warranty claim for differential damage and the dealer discovers you’ve crossed deep water despite having extended breathers, they may argue owner neglect. Document your maintenance if you’re concerned. For more on common issues that might trigger warranty concerns, see our guide to common JK problems by year.
What’s the difference between a breather filter and a check valve?
A breather filter allows air to flow both in and out while trapping contaminants like dust and water droplets. It’s best for dust protection but requires periodic cleaning. A check valve allows air out but prevents backflow in—it stops water from being sucked back into the diff during cooling but doesn’t filter dust. Many wheelers run filters on front diffs (high dust exposure) and check valves on rear diffs (water splash zone). Some hybrid systems combine both technologies.
Are there specific model year considerations for JK breather installation?
The three breather locations (front diff, rear diff, transfer case) are identical across all JK model years from 2007-2018. However, 2007-2011 JKs sometimes have different transfer case breather routing—some come from the factory with the line already running to the frame rail. Check your specific model before purchasing a kit. If you have a 2011+ JK with the optional factory snorkel option, coordinate your extended breather installation with snorkel routing to avoid line conflicts under the hood.
Building a Protected Drivetrain
Extended differential breathers represent one of the best cost-to-benefit modifications you can do on a JK. For $60 and an afternoon of work, you eliminate a major failure point that’s destroyed countless axles over the years. It’s not flashy. It won’t show up in Instagram photos. But it protects your drivetrain when it matters most.
The best diff breathers for jeep jk models are the ones you install before you need them. Water contamination happens in seconds, but the damage takes weeks to manifest. By the time you hear grinding or notice resistance in turns, you’re already looking at a rebuild. Extended breathers prevent the problem entirely.
Whether you run basic vent lines to the firewall or a sophisticated filtered system integrated with a snorkel, the goal stays the same: keep water and contaminants out while allowing pressure equalization. Match your setup to your wheeling style. Weekend trail riders can run simple filter setups. Hard-core rock crawlers who submerge axles regularly should invest in premium check-valve systems with individual filters.
Install them properly. Route lines away from heat sources. Secure everything so vibration won’t loosen connections. Inspect after water crossings. Change your gear oil if you suspect contamination. These simple practices extend the life of your axles by years and prevent trail-side failures.
If you’re serious about building out your JK for off-road use, extended breathers belong on the short list of essential mods—right alongside recovery gear, upgraded shocks, and soft top upgrades if you’re running a convertible. They’re foundational protection that enables everything else you want to do with your Jeep.
Your JK was built to handle punishment. Give it the basic protection it needs to survive deep water, thick mud, and dusty trails. Extended breathers do exactly that—simple, effective, and reliable.
Get the Free JK Build Planner
Complete PDF with mod checklists, gear ratios, tire sizing charts, and budget worksheets. Everything you need to plan your JK build.
No spam. Unsubscribe anytime. By subscribing, you agree to our Privacy Policy.
Allan
I'm Allan. I bought a 2014 Jeep Wrangler JKU and I research the hell out of every mod before I touch it. Everything here is tested or deeply researched on my own rig - no sponsored fluff, just honest findings.
Learn more about me →Get the JK Build Planner
Free PDF with complete build checklists, gear ratios, and tire fitment guides.
By subscribing, you agree to our Privacy Policy.
Related Articles

Best Sounding Exhaust for Jeep JK: 8 Aggressive Options Ranked
Find the best sounding exhaust for Jeep JK with our ranked guide. Compare 8 aggressive cat-back and axle-back systems for tone, drone, and value.

Best Axle Back Exhaust for Jeep JK: Budget-Friendly Sound Upgrades
Best axle back exhaust for Jeep JK delivers 70-80% of the sound improvement at 30-40% of the cost. Our top picks balance aggressive tone with zero drone and bolt-on installation.

Best Cat Back Exhaust for Jeep JK: Complete System Comparison
Compare the top cat-back exhaust systems for Jeep Wrangler JK. Stainless steel vs aluminized, drone ratings, installation tips, and honest sound reviews for 3.6L and 3.8L engines.