Best Light Bars for JK Wrangler: Complete Guide

The best JK light bar is the Rigid Industries E-Series Pro 50-inch ($1,200-1,500) with industry-leading optics and lifetime warranty. Best value: KC HiLiTES C-Series at $700-900. Budget option: Auxbeam 50” for $130-180. We’ll guide you through sizing, mounting options, wiring requirements, and help you choose the right bar for your specific build needs.
JK Light Bar Types and Mounting Options
Before shopping for brands, you need to decide where you’re mounting your light bar and what size fits your goals.
50-52 Inch Roof Mount Light Bars
The classic JK light bar setup places a 50-52 inch bar above the windshield, spanning pillar to pillar. This location provides maximum forward illumination and keeps the light above your hood line for the best beam projection.
| Pros | Cons |
|---|---|
| Maximum light output | Wind noise at highway speeds |
| No hood glare | Requires drilling or clamp mounts |
| Clears hood accessories | Higher center of gravity |
| Impressive appearance | More expensive mounting hardware |
Best for: Dedicated trail rigs, overland builds, and owners who prioritize maximum light output over highway comfort.
Mounting options: Roof mount brackets bolt to the windshield frame (requires drilling) or clamp to the rain gutters. Clamp mounts avoid drilling but may rattle over time.
20-22 Inch Bumper and Grille Mount Light Bars
A 20-inch bar fits perfectly in most aftermarket bumpers or behind the factory grille. This size offers excellent performance without the wind noise issues of roof mounts.
| Pros | Cons |
|---|---|
| Easy installation | Less total light output |
| No wind noise | Potential hood glare |
| Hidden mounting options | May require bumper modification |
| More affordable | Lower mounting height |
Best for: Daily drivers, mild trail use, and owners who want improved lighting without major modifications.
Mounting options: Many aftermarket bumpers include light bar mounting provisions. Grille-mounted bars fit behind the factory seven-slot grille with minimal modification.
Windshield Pillar Pods and Cube Lights
For targeted lighting without a full light bar, pillar-mounted pods offer versatility. These small LED cubes mount to A-pillar brackets and can be aimed independently.
| Configuration | Typical Output | Best Use |
|---|---|---|
| 2-pod setup (one per pillar) | 4,000-8,000 lumens total | Trail spotting, camp lighting |
| 4-pod setup (two per pillar) | 8,000-16,000 lumens total | Serious trail use, racing |
Best for: Owners wanting adjustable lighting, rock crawlers needing side illumination, and builds where a full bar doesn’t fit the aesthetic.
Combination Setups
Many JK owners run multiple light bar configurations for maximum flexibility.
Popular combinations:
- 50-inch roof bar + 20-inch bumper bar (different beam patterns)
- 20-inch bumper bar + pillar pods
- Hood-mounted bar + pillar pods
Running multiple lights on separate switches allows you to dial in exactly the illumination you need for different situations.
Light Bar Specifications Explained
Understanding light bar specs helps you compare options accurately.
Lumens vs. Lux
Lumens measure total light output from the source. Lux measures light intensity at a specific distance. A light bar can have high lumens but poor lux if the optics scatter the light inefficiently.
| Spec | What It Means | What to Look For |
|---|---|---|
| Raw lumens | Total light produced | Higher is brighter, but not the whole story |
| Effective lumens | Light after optic losses | More accurate brightness indicator |
| Lux at distance | Intensity at 10m or 30m | Determines usable throw distance |
Beam Patterns
| Pattern | Description | Best For |
|---|---|---|
| Spot | Narrow, focused beam | Long-distance illumination, high-speed driving |
| Flood | Wide, dispersed beam | Close-range peripheral vision, camp lighting |
| Combo | Mixed spot and flood | Most trail use - balance of throw and spread |
Our recommendation: Combo beam patterns work best for most JK owners. They provide enough throw to see obstacles ahead while illuminating the sides of the trail.
Single Row vs. Dual Row
| Type | Depth | Output | Best For |
|---|---|---|---|
| Single row | 2-3 inches | Lower per inch | Grille mounts, sleek appearance |
| Dual row | 4-5 inches | Higher per inch | Maximum output, roof mounts |
Single-row bars fit in tighter spaces and create less wind resistance. Dual-row bars produce more light per inch of bar length.
Top JK Light Bar Picks by Category
Premium: Best Performance Light Bars
These brands represent the pinnacle of LED light bar technology with superior optics, build quality, and warranty support.
Rigid Industries E-Series Pro
Rigid set the standard for premium LED light bars. Their E-Series Pro line uses proprietary Specter optics for exceptional beam patterns.
| Size | Output | Price Range |
|---|---|---|
| 20-inch | 11,400 lumens | $500-600 |
| 50-inch | 28,000+ lumens | $1,200-1,500 |
Why choose Rigid: Industry-leading optics, lifetime warranty, proven durability. The benchmark other brands try to match.
Baja Designs OnX6+
Baja Designs competes directly with Rigid, offering slightly different optics that some users prefer.
| Size | Output | Price Range |
|---|---|---|
| 20-inch | 12,000+ lumens | $550-700 |
| 50-inch | 30,000+ lumens | $1,400-1,700 |
Why choose Baja: Excellent high-speed beam patterns, racing pedigree, lifetime warranty.
Mid-Range: Best Value Light Bars
These brands deliver 80-90% of premium performance at 50-60% of the price.
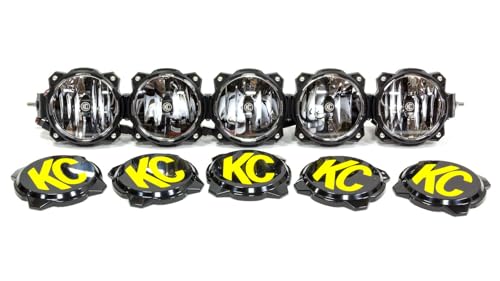
KC HiLiTES C-Series
KC has been making off-road lights since 1970. Their C-Series LED bars offer proven performance at reasonable prices.
| Size | Output | Price Range |
|---|---|---|
| 20-inch | 10,000+ lumens | $300-400 |
| 50-inch | 24,000+ lumens | $700-900 |
Why choose KC: Established brand, good warranty, solid performance without premium pricing.
Diode Dynamics SS-Series
Diode Dynamics offers excellent optics at competitive prices with strong customer service.
| Size | Output | Price Range |
|---|---|---|
| 18-inch | 8,500+ lumens | $250-350 |
| 50-inch | 22,000+ lumens | $600-800 |
Why choose Diode Dynamics: Great optics for the price, excellent customer support, lifetime warranty on LEDs.
Budget: Entry-Level Light Bars
Budget bars work for occasional use but expect compromises in beam pattern quality and longevity.
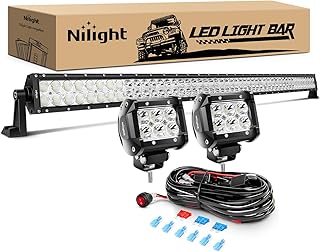
Nilight
The most popular budget light bar brand on Amazon. They produce usable light but with inferior optics.
| Size | Output | Price Range |
|---|---|---|
| 20-inch | 8,000+ lumens | $40-60 |
| 52-inch | 20,000+ lumens | $80-120 |
Why choose Nilight: Extremely affordable, adequate for occasional use, widely available.
Auxbeam
Another budget brand with slightly better build quality than the cheapest options.
| Size | Output | Price Range |
|---|---|---|
| 20-inch | 9,000+ lumens | $50-80 |
| 52-inch | 22,000+ lumens | $100-150 |
Pros:
- Purpose-built for JK Wrangler ensures proper fitment and function
- Durable construction handles trail abuse and daily driving
- Backed by positive community reviews and trail-tested results
Cons:
- Premium pricing compared to generic aftermarket options
- May require longer lead times for specialty or popular items
- Some products require professional installation for best results
Why choose Auxbeam: Better build quality than bottom-tier options while remaining affordable.

Pillar Pod Recommendations
Rigid D-Series Pro ($150-200/pair): The gold standard for pod lights with excellent optics.
KC HiLiTES Flex Era ($200-300/pair): Adjustable design with multiple beam options.
Diode Dynamics SS3 ($200-280/pair): Excellent output and beam patterns at competitive prices.
Budget pick - Nilight Pods ($25-40/pair): Adequate for occasional use at rock-bottom prices.
Light Bar Wiring Requirements
Pros:
- Purpose-built for JK Wrangler ensures proper fitment and function
- Durable construction handles trail abuse and daily driving
- Backed by positive community reviews and trail-tested results
Cons:
- Premium pricing compared to generic aftermarket options
- May require longer lead times for specialty or popular items
- Some products require professional installation for best results
Proper wiring is critical for safety and performance. A poorly wired light bar can cause fires, damage your electrical system, or simply not work reliably.
Wiring Component Requirements
| Light Bar Size | Wire Gauge | Fuse Size | Relay Rating |
|---|---|---|---|
| Under 100W | 14 AWG | 15 amp | 30 amp |
| 100-200W | 12 AWG | 20 amp | 40 amp |
| 200-300W | 10 AWG | 30 amp | 40 amp |
| Over 300W | 8 AWG | 40 amp | 80 amp |
Essential Wiring Components
Every light bar installation needs:
- Relay: Controls high current without running it through your switch
- Fuse: Protects against shorts and overloads (install within 12 inches of battery)
- Switch: Controls the relay circuit
- Appropriate gauge wire: Sized for your light bar’s current draw
- Weatherproof connectors: For any exterior connections
Wiring Harness Options
Pre-made wiring kits ($20-50): Include relay, fuse, switch, and wiring. Adequate for single light bars but often use marginal wire gauges.
Quality aftermarket kits ($50-100): Better components, heavier wire, weatherproof connections. Brands like Rigid and Baja Designs sell excellent kits.
Custom wiring (varies): For complex multi-light setups, custom wiring through an auxiliary fuse box provides the cleanest installation.
Switch Options for Light Bars
Dash-Mounted Switches
| Type | Pros | Cons |
|---|---|---|
| Rocker switch | Simple, cheap | Requires dash drilling |
| Factory-style switch | Clean appearance | More expensive, limited options |
| Push button | Compact | Can be hard to find in dark |
Switch Panel Systems
Switch panels provide multiple controlled circuits with a clean installation. Popular options include:
- sPOD: Industry standard with excellent build quality ($400-600)
- Trigger Controller: Wireless control via smartphone ($300-400)
- Switch-Pros: App-based control with physical backup ($350-500)
For a complete overview of aux switches and power distribution, see our Best JK Aux Switches guide and JK Electrical Upgrades Guide.
Installation Considerations
Roof Mount Installation
- Choose your brackets: Determine if you’re drilling into the windshield frame or using clamp mounts
- Plan wire routing: Decide how you’ll run wires from the roof to the engine bay
- Check clearance: Ensure your bar won’t hit garage doors or low branches
- Consider wind noise: Look for aerodynamic mounting brackets designed to reduce turbulence
Bumper Mount Installation
- Verify fitment: Measure your bumper’s light bar provisions carefully
- Check for interference: Ensure the bar won’t contact the hood or grille at full suspension compression
- Plan for access: Consider how you’ll change a flat with the light bar in place
Wire Routing Tips
- Use existing firewall grommets when possible
- Split loom protects wires from abrasion and heat
- Leave service loops for suspension movement
- Secure wiring away from exhaust components
- Use weatherproof connections for any exterior splices
- Integration with auxiliary switches keeps multiple light circuits organized and protected
Maintenance and Longevity
Extending Light Bar Life
- Keep lenses clean: Dirt and bugs reduce light output and can cause overheating
- Check mounts regularly: Vibration loosens bolts - use thread locker on critical fasteners
- Inspect wiring annually: Look for chafed insulation, corroded connections, and loose grounds
- Store with covers: If you don’t use your lights often, covers protect lenses from UV damage
Troubleshooting Common Issues
| Problem | Likely Cause | Solution |
|---|---|---|
| Flickering | Loose connection | Check all connectors, especially grounds |
| Dim output | Corroded terminals | Clean connections, apply dielectric grease |
| Partial failure | Individual LED failure | Contact manufacturer for warranty |
| No power | Blown fuse or bad relay | Test fuse, replace relay if needed |
Legal Considerations
Light bars are auxiliary off-road lights, not street-legal equipment. Understanding the legal landscape helps you avoid tickets.
General Rules
- Never operate on public roads: Light bars blind oncoming traffic
- Cover requirements: Some states require covers over auxiliary lights on public roads
- Mounting height limits: Some jurisdictions limit auxiliary light mounting height
- Aiming matters: Even off-road, improperly aimed lights create hazards
Best Practices
- Wire your light bar to a dedicated switch you won’t accidentally activate
- Consider amber covers for dusty or foggy conditions (legal benefit varies by state)
- Install a clearly labeled switch so passengers know not to activate it on the highway
Making Your Decision
For Daily Drivers with Occasional Trail Use
Recommendation: 20-inch bumper-mounted bar in combo beam pattern
Why: Easy installation, no wind noise, sufficient for most trails, discrete appearance. Consider KC HiLiTES or Diode Dynamics for the best value.
For Dedicated Trail Rigs
Recommendation: 50-inch roof mount + pillar pods
Why: Maximum light output for technical night wheeling, flexibility to run different combinations. Premium brands like Rigid or Baja Designs justify their cost for serious use.
For Budget-Conscious Builds
Recommendation: 20-inch budget bar (Nilight or Auxbeam) + quality wiring kit
Why: Acceptable performance at minimal cost. Invest savings in proper wiring rather than upgrading the bar itself.
Related Articles
- JK Electrical Upgrades Guide - Complete guide to JK electrical system upgrades
- Best JK Aux Switches - Control your light bars safely with proper relay protection
- JK Dual Battery Setup Guide - Power multiple accessories reliably
- Best LED Headlights for JK - Complement your auxiliary lights with upgraded headlights
- JK Winch Installation Guide - Another high-draw accessory that requires proper wiring
- Best JK Front Bumpers - Many bumpers integrate light bar mounting points
Related Guides
Explore more JK upgrade guides to complement your build:
- Electrical Upgrades Guide — our complete electrical system overview
- Onboard Air Compressor Guide — onboard air system setup
- Best Winches for JK — winch options that need proper wiring
- Armor & Protection Guide — bumper and protection upgrades
- Best JK Phone Mount — phone mounting solutions
Frequently Asked Questions
What size light bar fits a JK Wrangler?
The JK can accommodate various light bar sizes depending on mounting location. For roof mounts above the windshield, 50-52 inches is standard and spans pillar to pillar. Bumper or grille mounts typically fit 20-22 inch bars. Hood mounts work well with 10-12 inch bars. The most popular configuration is a 50-inch roof-mounted bar for maximum output, though 20-inch bumper bars offer easier installation and eliminate wind noise concerns.
Do I need a relay for my JK light bar?
Absolutely yes. Any light bar installation should include a relay in the wiring circuit. The relay handles the high-current load (potentially 30+ amps) while your dash switch only controls the relay’s low-current trigger circuit (less than 1 amp). Without a relay, you risk melted switches, burned wiring, and potential electrical fires. Every quality wiring harness kit includes an appropriately rated relay.
Will a light bar drain my JK battery?
Light bars only consume power when switched on, so they won’t drain your battery while parked (assuming the switch is off and properly wired). When operating, a 50-inch dual-row bar draws 25-35 amps, well within your JK’s 140-160 amp alternator capacity. For extended use at camp, run your engine periodically or consider a dual battery setup to avoid draining your starting battery.
Are cheap Amazon light bars worth it?
Budget light bars from brands like Nilight produce usable light and work fine for occasional trail use. However, they typically have inferior beam patterns that scatter light inefficiently, shorter lifespans, and questionable weatherproofing. Premium brands like Rigid and Baja Designs offer significantly better optics, durability, and warranties. For the best value balance, consider mid-range brands like KC HiLiTES or Diode Dynamics that deliver near-premium performance at reasonable prices.
Can I run a light bar on the street legally?
Light bars are auxiliary off-road lights that are not DOT-approved for on-road use. Operating them on public roads is illegal in virtually all jurisdictions and can result in tickets. The intense light output blinds oncoming drivers, creating serious safety hazards. You can have light bars mounted on your JK for off-road use, but keep them off while driving on streets and highways. Some states require physical covers over auxiliary lights when driving on public roads.
Get the Free JK Build Planner
Complete PDF with mod checklists, gear ratios, tire sizing charts, and budget worksheets. Everything you need to plan your JK build.
No spam. Unsubscribe anytime. By subscribing, you agree to our Privacy Policy.
Frequently Asked Questions
What size light bar fits a JK Wrangler?
The JK can accommodate various light bar sizes: 50-52 inches for roof mounts (above the windshield), 20-22 inches for bumper or grille mounts, and 10-12 inches for hood mounts. The most popular size is a 50-inch bar for maximum light output, though 20-inch bars offer easier installation and less wind noise.
Do I need a relay for my JK light bar?
Yes, any light bar should be wired with a relay. The relay handles the high-current load while your switch only controls the relay's low-current circuit. This prevents melted switches, burned wiring, and potential electrical fires. Most quality light bar wiring kits include a relay.
Will a light bar drain my JK battery?
Light bars only draw power when turned on, so they won't drain your battery while parked (assuming the switch is off). When running, a 50-inch dual-row bar draws 25-35 amps - well within your JK's alternator capacity. Always run your engine when using high-powered lights for extended periods.
Are cheap Amazon light bars worth it?
Budget light bars produce light, but typically have poor beam patterns, shorter lifespans, and questionable waterproofing. They work for occasional use, but premium brands like Rigid and Baja Designs offer better optics, durability, and warranties. Consider mid-range options like KC HiLiTES for the best value balance.
Can I run a light bar on the street legally?
Light bars are not DOT-approved for on-road use and are illegal to operate on public roads in most states. You can have them mounted but must keep them off while driving on streets and highways. Some states require covers over auxiliary lights when driving on public roads.
Jeep JK Guide
We're JK owners who've been building, breaking, and fixing Wranglers for years. Everything here is tested on our own rigs - no sponsored fluff, just honest recommendations.
Learn more about us →Get the JK Build Planner
Free PDF with complete build checklists, gear ratios, and tire fitment guides.
By subscribing, you agree to our Privacy Policy.
Related Articles
Best LED Halo Headlights for Jeep Wrangler JK: Top 7 Picks
The best LED halo headlights for Jeep Wrangler JK balance brightness, DOT approval, and budget. Compare 7 top picks from $60-$600 with installation tips.
How to Install LED Headlights on Jeep Wrangler JK: Complete Step-by-Step Guide
Learn how to install LED headlights on your Jeep Wrangler JK with this step-by-step guide. DOT-approved options, aiming tips, and flicker fixes included.
Best LED Fog Lights for Jeep JK: Brightest Off-Road Vision